Soundmax SM-CMD3003 User Manual
Browse online or download User Manual for Car radio Soundmax SM-CMD3003. SoundMax SM-CMD3003 User Manual
- Page / 68
- Table of contents
- TROUBLESHOOTING
- BOOKMARKS
- SM-CMD3003 1
- Table of contents 2
- Important safeguards 3
- Installation/Connections 4
- Attaching the control panel 6
- Detaching the front panel 6
- Connection diagram 7
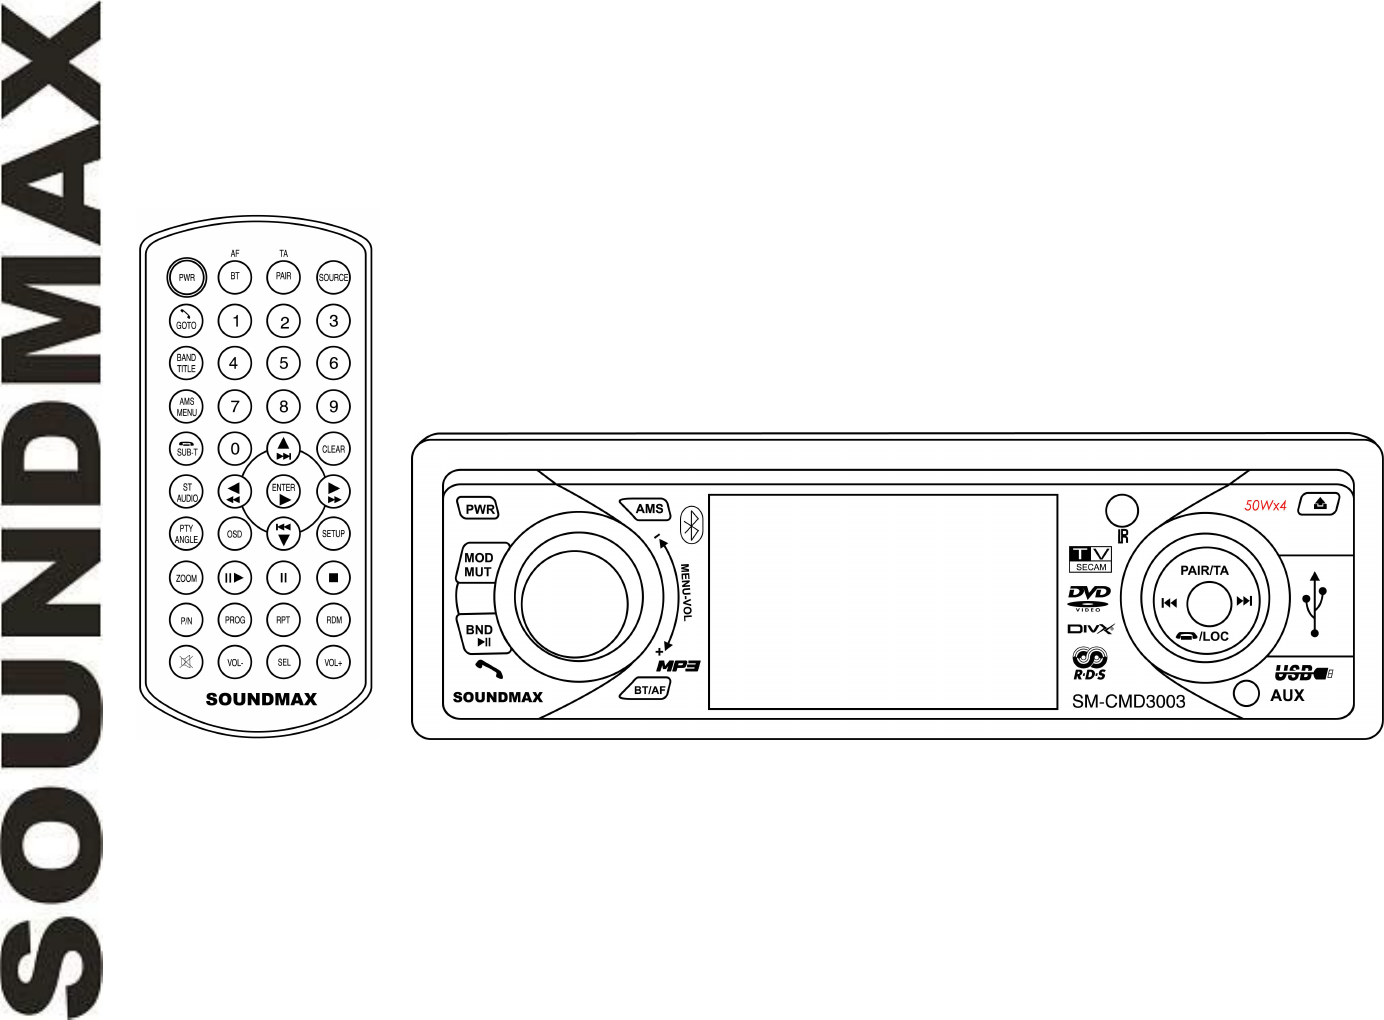
- Panel controls 8
- Inner panel 9
- Remote control (RC) 10
- / FAST 10
- General operations 11
- Radio operations 13
- DVD/CD operations 16
- MP3 overview 21
- TV tuner operations 23
- Antenna select 24
- Bluetooth operations 25
- System setup 27
- Dolby digital setup 28
- Preference setup 28
- Anti-theft system 30
- Handling compact discs 31
- Troubleshooting guide 32
- Specification 33
- 34
- 35
- 36
- 38
- 38
- 39
- 40
- 42
- 43
- 45
- 46
- 3 55
- 57
- System () 58
- 58
- Bluetooth 59
- 62
- 65
- 66
- 68
Summary of Contents
SM-CMD3003MULTIMEDIA DVD/CD/MP3 RECEIVER WITH BUILT-IN 3” TFT DISPLAY Bluetoothand TV tunerInstruction manual DVD/CD/MP3-
10Remote control (RC)1. AF/BT button2. PWR button3./GOTO button4. BAND/TITLE button5. AMS/MENU button6. /SUB-T button7. ST/AUDIO button8. OSD bu
11General operationsReset the unitOperating the unit for the first time or after replacing the car battery, you must reset the unit.Press REL button,
125. Press SEL or ENTER to confirm.6. Select BACK to return to settings list.7. Select EXIT to exit settings list window.Mode selectionPress the SO
13Radio operationsNote: RDS (Radio Data System) service availability varies with areas. Please understand if RDS service isnot available in you area,
14Preset scanSelect a band. Press AMS button to scan all preset stations in the memories of the current band and stay oneach memory stations for about
15TA (Traffic Alarm) function Briefly press the PAIR/TA button to turn on or turn off the TA function. When TA is enabled (on), the tuner starts s
16DVD/CD operationsDisc glossaryPBC (PlayBack Control)PBC is a menu recorded on the disc with SVCD or VCD2.0 format. For the discs contained PBC, it c
17Inserting the USB deviceInsert the USB device into USB jack. Then the playing mode will be changed into USB mode.The first USB device track playback
18Playing the previous/next trackDuring DVD playback, press to replay the current track, press and hold within 3 seconds to play theprevious track
19Selecting the channel (for VCD only)During VCD disc playback repeatedly press the ST/AUDIO button on the RC to select the channel: Left =>Right =
2Dear customer!Thank you for purchasing our product. For safety, it is strongly recommended to read this manual carefullybefore connecting, operating
204. Then press Number buttons to input the desired track/chapter number (or use the / buttons toselect the setting for Audio or Subtitle mode).5.
21MP3 overviewNotes on MP3- MP3 is short for MPEG Audio Layer 3 and refers to an audio compression technology standard.- This product allows playback
22Notes on creating your own CD-Rs or CD-RWs containing MP3 files- To enjoy high quality sound, we recommend converting to MP3 files with a sampling f
23TV tuner operationsPress MOD/MUT button several times to turn on activate TV source.Selecting channel1. Press numeric buttons from 1-9 on RC to sel
24SystemAntenna selectPress / buttons to select right or left antenna, then press ENTER button.Note: Press and hold OSD button it to show the curren
25Bluetooth operationsUsing a Bluetooth Wireless ConnectionThe device can be dialed wirelessly in bluetooth status. Before using the bluetooth functio
26Using the Unit as a Hands-free DeviceWhen the unit is ringing, then it appears call from and the phone number ID *********** on the dialing.To accep
27System setup1. Press and hold SETUP button on the RC to enter the setup menu. In Setup mode, press SETUP keyagain to quit the setup page.2. Use th
28Dolby digital setup DUAL MONOChoose the mode of the audio output:Set stereo: choose this setting, when 5.1-channel sound playing,two channels of s
29Set the control level:(1) with the least limits when playing.(8) with the most limits when playing.Original setting: OFF.Note: The rating can be sel
3Important safeguards- Read carefully through this manual to familiarize yourself with this high-quality sound system.- Disconnect the vehicle's
30Anti-theft systemThis unit is equipped with a slide-down detachable and mask panel. Panel can be detached and taken withyou, helping to deter theft.
31Handling compact discsDirty, scratched or warped discs may cause skip ping or noise.Handle the disc only by the edges. To keep clean do not touch it
32Troubleshooting guideSymptom Cause SolutionGeneralNo powerThe car ignition is not on.The fuse is blown.If the power supply is properly connected tot
33SpecificationGeneralPower supply12 V DCMaximum power output 50 W x 4 channelsDimensions (L x W x H) 192 x 178 x 50 mmDSP: Classic, Pop, Rock, FlatFM
34!.
35- , .-
36, .
381. , , )
39:- , , 4
4Installation/ConnectionsFirst complete the electrical connections, and then check them for correctness.Installation methodIt is an anti-theft install
401. PWR, . .2. MENU
415. / /, . RADIO ()
421. EJECT2. RESET3. ()1. AF/BT2. PWR3. /GOTO4
43 RESET () REL . . RESET, .
44 Video: : Bright (), Contrast (), Color), Hue (), Wide (), Defaul
45 P/N , : PAL, NTSC, AUTO ().
46: RDS () . , RDS
47MS, 7.
48 PTY ()1. OSD, PTY .2. PTY/ANGLE ,
49 DVD/CD PBC () – ,
50 P3 : 32 - 320 ( 128). : *.ACC,
51 VCD/CD STOP , . BND/PLAY/PAUSE/DIAL, .
52 ( DVD ) DVD-, PTY/ANGLE
53PBC () ( VCD ) VCD PBC, 1-
54 (, , ).
5533- 3 MPEG 3 .-
56- 3 3 , ,
57 MOD/MUT , TV; TV.1.
58System () /, , ENTER
59 Bluetooth BluetoothBluetooth .
6Attaching the control panel1. Insert the right side of the control panel (pic. 1, A) into theshaft of the main unit (pic. 1, B).2. Push the panel t
60 BT/AF, , PAIR/TA,
61 Bluetooth ,
621. SETUP , . SETUP
63 , ,
64
65. ,
66, . (
67 ..
68 .
7Connection diagramNotes:- In spite of having any kinds of speaker system, must use 4 ohms impedance of speaker to reduce thedistortion during high vo
8Panel controls1. PWR buttonPress it to turn the power on. Press again to turn the power off.2. MENU-VOL knob/SEL buttonRotate VOLUME knob clockwise
95. / buttonsDuring playback repeatedly press the / buttons to go to previous/next track.In RADIO mode press the / buttons to search the station
Related products and manuals for Car radio Soundmax SM-CMD3003
 (71 pages)
(53 pages)
(64 pages)
(84 pages)
(71 pages)
(71 pages)
(53 pages)
(64 pages)
(84 pages)
(71 pages)
 (37 pages)
(62 pages)
(60 pages)
(81 pages)
(41 pages)
(76 pages)
(52 pages)
(66 pages)
(81 pages)
(38 pages)
(33 pages)
(38 pages)
(67 pages)
(64 pages)
(62 pages)
(37 pages)
(62 pages)
(60 pages)
(81 pages)
(41 pages)
(76 pages)
(52 pages)
(66 pages)
(81 pages)
(38 pages)
(33 pages)
(38 pages)
(67 pages)
(64 pages)
(62 pages)
© 2020, manymanuals.com. All rights reserved. | 0.582 s |
 Manymanuals.com
 Manymanuals.de
 Manymanuals.fr
 Manymanuals.it
 Manymanuals.pl
 Manymanuals.cz
 Manymanuals.es
 Manymanuals-pt.com
Comments to this Manuals